


|
Truss Rod Adjustment
Truss rod adjustment is an important step in any guitar setup. I'm going to assume for this section that your neck is in decent shape. If you've got frets that are worn at each string location down to the fretboard surface this isn't the place for you. If you've got frets popping out of their grooves this isn't the place for you either. These kind of problems fall under the luthier repair category. Personally I have never refretted a guitar, it's something I'm not really interested in. I havn't played long enough to wear any frets out, and if I did I'd just buy a replacement neck on ebay. Even an original, stamped American Fender neck is probably cheaper to buy than to have the frets replaced. Having said that if you've got some vintage strat worth twenty five grand, don't be chucking the neck in the woods. Same goes for any guitar without a bolt on neck, you folks have no choice. 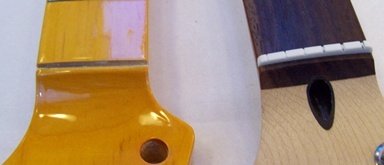
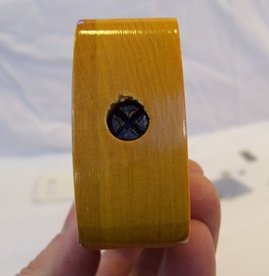
Alright enough drivel, take a look at the photo above, and to the left. The placement of the truss rod adjustment is always in one of two locations. Either at the heel of the neck, or at the headstock. A steel truss rod is just that, a rod that runs in a bow shape, bowing down away from the fingerboard, like a truss, from one end of the neck to the other. The purpose of the rod is to counteract the tension of the strings, so that overtime your neck doesn't end up looking like a banana. All guitars have truss rods,and truss rod adjustment, or I should say that every guitar I've seen, read, or heard about has a truss rod. Now in my constant search for knowledge, I've read about a thousand variations on when to make a truss rod adjustment. Many are filled with fear gripping mystery about how, by the VooDoo gods, your going to turn your neck into a worthless piece of firewood, by making the truss rod adjustment yourself. Don't believe any of it, your capable, and here's when and how to do it. Lay your guitar flat somewhere. Place a Capo on the strings at the first fret, oh and by the way, make sure the guitar is tuned. Now fret the low E string at the last fret. With an automotive feeler gauge check and see how much clearance you've got at the eight or ninth fret. You should have anywhere from .008-.012 inches of clearance between the top of the fret, and the bottom of the string. Now look, if you have .013 inches, and you like how it plays, leave it alone. This is by no means an exact science. However if you have a quarter inch, and I've seen this, you need a truss rod adjustment. Conversely if you've got no clearance, you might have some problems too. Ok, so you've checked the string height at the eighth or ninth fret and you've got a quarter inch gap. You have to adjust the truss rod, but you're in luck because your truss rod adjustment is at the headstock. Now find an Allen head wrench that will fit the allen screw in the headstock. If you can't get at the allen screw because of the strings loosen the D and G and pull them off to the side. Now here's where all the VooDoo, HooDoo stuff comes in. If you hook up an impact wrench to adjust your truss rod you will break it. I've yet to find anyone that stupid, adjust the truss rod gently by an eighth to a quarter turn at a time, in a clockwise direction. Every time you make an adjustment tune the guitar, and check for clearance. If you've got a long way to go, say a half inch, it might be wise to adjust, then let it sit for a few days, then adjust again. It's like jacking up an old house, do it slow and you have a much lesser chance of breaking anything. Now as a little foot note some necks come with a bi-directional truss rod, so that if your neck is bending up toward the strings, you can turn the adjusting nut counter clockwise, and bring the neck down. If your truss rod adjustment is at the heal of the neck, your adjustment is a little more challenging. Measure and take note of the clearance you have. Remove the strings from the guitar, and then unbolt the neck and remove. Place a strait edge, a two foot level will do fine, between the first and last fret. Now measure the amount of clearance you have between the eighth or ninth fret to the level. It will probably measure slightly less than when the strings were on. Say your goal is to have .010 inches of relief. When you compare the two numbers, for example if you measured .017 inches when the strings were on, and now you're getting .015 inches, you know you want to adjust the truss rod so that you have .008 inches of relief. Figuring that when restrung, the string tension will bow the neck back so that your relief is.010 inches. If you're in the predicament where you have no clearance at all pray for a bi-directional truss rod. You can tell if you have a bi-directional truss rod adjustment by turning the adjustment screw counterclockwise. If the adjustment screw keeps turning forget it, if you go a quarter to half a turn, and you start getting tension again you're probably in luck. Adjust as I described above for each neck design. I should have said this earlier, but check with the manufacturer for not only bi-directional truss rods, but all recommended measurements. Now wipe those tears away if you have a bowed up neck and no bi-directional truss rod, all is not lost. I have an Epiphone Les Paul that had this problem. The neck somehow ended bowed up towards the string, and unless somebody corrects me, this thing has a one way truss rod. I could turn it four revolutions counterclockwise, unless I'm missing something it's one way. And of course I didn't heed my own advice, and check with the manufacturer. So here's what I did, I loosened the truss rod by a revolution or so. Got two sets of Ernie Ball 54's and strung the guitar with, two low E strings, one A, two G's, and a B. I tensioned the strings a full step above tune, and stuck it in my daughters bathroom where she takes regular half hour showers. Checking string tension daily, a month later I had .020 inchs of relief. This is not in the Gibson hand book, but it worked. If your all good with the truss rod move on to step three.
return from Truss rod adjustment to Electric Guitar Info home |